Editing Phone Photos
I will start by saying, I LOVE taking pictures with my big camera and editing those, it's my passion. I love all of my different lenses, I love the control I have when taking those photos, and I am very particular about editing those camera photos.
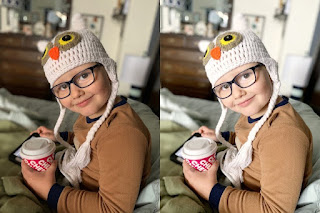
BUT, sometimes I don't have my big camera---and my phone is very convenient, so I also use it often. The only downfall is sometimes they don't look bright enough to me, or the color is a bit off, etc. Now, I am not one to wants to mess around with lots of editing the pictures I take with my phone, so I will share with you the simple edits I apply to most of the photos I take on my phone.
 |
| "Before" and "After" my simple edits |
Next, I use the PicTapGo app. I only use the basic free app, I do not pay for the "extras". Once you get the app, it's pretty simple to use. I typically use 3-4 filters and pretty much ignore the rest.
I make sure my phone brightness is turned all the way up while I am editing.
First, I usually have to brighten up the photo by using the "lights on" filter. It's the very first filter. I adjust the slider until the brightness looks good. Sometimes, if a photo is super dark, I have to apply this filter twice.
 |
| Original Photo |
 |
| After the "Lights On" Filter |
If my photo color cast is either really warm or really cool, I change the white balance. The white balance is correct when the white parts of my photo look pure white instead of either bluish or yellowish. If they look yellow, I apply the "cool it down" filter. If they look blue, I apply the "warm it up" filter. I also sometimes have to use this filter two times, and I adjust the slider to the amount that looks good to me.
 |
| After the "Cool it Down" Filter |
*Occasionally, I try the "autocolor" filter. I find that usually that messes the whole photo up and I have to hit "undo", but sometimes it works well.
Finally, I use the "auto contrast" filter, and adjust the slider. Usually I move it pretty far down, so it's just a touch of added contrast. This filter makes the blacks pop in the photo.
 |
| After the "Auto Contrast" Filter |
When I'm finished editing, I save the photo to the camera roll. The nice part about this app is that if I have 4 pictures in a row in the same place (same lighting conditions), I only have to edit one picture and I can "batch edit" the rest by selecting "batch" at the bottom of the screen. This applies the same filters to all of the photos I choose from the camera roll.
Here is the final "before and after" photo.
 |
| "Before" and "After" my quick edits |
I hope this helps you with some quick edits to your phone pictures to really help them shine!!!
BONUS TIP: These edits also work when taking photos of your completed scrapbook layouts!


Comments
Post a Comment